by Amanda Marchese
In the modern world of fancy espresso machines and high-tech coffee makers, such as Tassimo and Nespresso, many people overlook of more old-school methods of coffee making. Stovetop espresso is a method of brewing coffee still cherished by many Europeans and Latin Americans, as well as European-Montrealers. Stovetop espresso was the first type of coffee introduced to me by my Italian grandfather, and is still the only way he will make or drink coffee.
This may seem like a pretty ancient way to make coffee, but it's a fun alternative that is sure to impress guests. The taste and intensity of the flavor is basically the same as that of a traditional espresso from an espresso machine. The only differences are that the stovetop espresso makes more volumes of espresso at one time, and there is no crema that floats on the surface of your beverage. It's a bummer, but you'll get over it. The main attraction is that stovetop espresso percolators are significantly less expensive than espresso machines, but still has a quality taste and punch.
How it works? It may not be as easy as pressing a "start" button on an instant coffee machine, but it's still rather simple. The coffee is brewed using heat from the stove that boils the water in the lower chamber (the boiler). The pressure of the boiled water and steam pushes the water up the funnel, through the ground coffee and reappears as dark-moka-goodness in the upper chamber.
Stovetop espresso was first patented in Italy in 1933 and mass-produced by manufacturer Bialetti in the same year. Bialetti remains the leading manufacturer for stovetop espresso makers called "Moka Express". The design hasn't changed much since the 30s, giving the Bialetti brand of Moka Pots a sense of tradition and culture, and for its users, a sense of nostalgia.
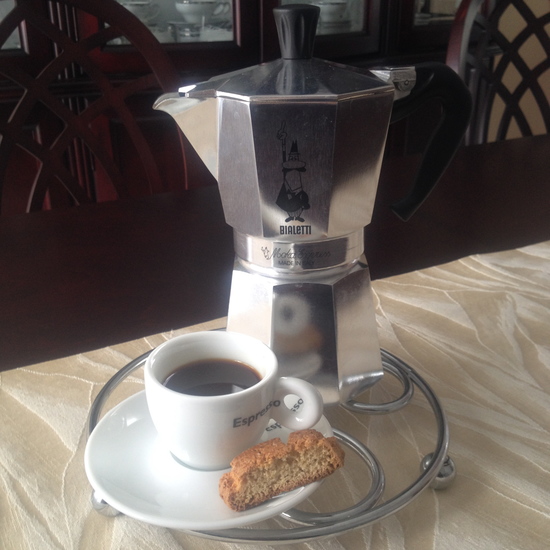
The mascot on the Bialetti percolators is a mustached man (l'omino con i baffi) with his hand and index finger in the air as if ordering another espresso. And once you've tasted this kind of espresso, you'll be doing the same!
The following are a set of instructions that will cover the preparation, the brewing and the serving of stovetop espresso. The length of time needed for the task varies depending on the size of the percolator. You can buy different size stovetop espresso machines depending on how many espresso cups you want to make (I have four different sizes at home). Sizes range from 1-cup to 12-cup percolators. For the purpose of this instruction set, I will be using a standard 10 oz. Moka Express from Bialetti, which makes 6 cups of espresso. For this size, the task should take approximately 6 minutes.
Preparation
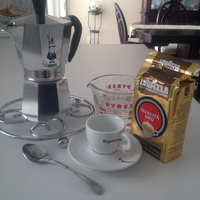
You'll need:
- A stove
- Stovetop coffee maker (Preferred brand: Bialetti, can be purchased at any home retailer or kitchen appliance store).
- Ground coffee, flavor and brand of your choice (Preferredbrand: LavAzza Qualit
à Oro)*- A spoon
- Tap or filtered water
- Pot coaster or any heat resistant surface
- Espresso cup(s)
* Note: If you wish to grind your own coffee beans, you will need to purchase whole coffee beans (also an offered product of LavAzza). You will also need a coffee grinder. Depending on if you use an electric coffee grinder or manual coffee grinder, this should take about 2 to 4 minutes.
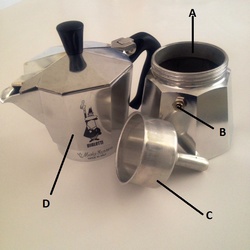
- The boiler (A): The bottom chamber that holds and boils the water.
- Safety release valve (B): Found on the boiler wall and can also be seen from the interior the boiler.
- Funnel-shaped filter (C): Inserted on top of the boiler, with the funnel entering the boiler. This holds the ground coffee.
- Upper chamber (D): Screws onto the bottom half of the percolator. This will hold the freshly brewed coffee.
Brewing Instructions
Step 1: Unscrew top canister from the bottom half.
Step 2: Remove the funnel-shaped filter from the boiler.
Step 3: With cold tap or filtered water, fill the boiler up until approximately half- way past the safety release valve found on the inside wall of the boiler.
Caution: Filling the boiler with water past the safety release valve or to the top rim will cause the coffee to overflow while brewing. Not fun to clean up.
Step 4: Place the funnel-shaped filter back into the boiler.
Step 5: Evenly fill the funnel-shaped filter with ground coffee using a spoon without compacting the coffee grinds. The ground coffee needs to be light and loose in the filter for the water to pass through.
Tip: If you need to spread the coffee grinds in the filter, pick at the coffee grinds with the tip of the spoon. Like so:
Step 6: Tightly screw the upper chamber back onto the bottom half.
Caution: If the upper chamber is not screwed on correctly, water as it's being boiled may spill out from the sides.
Step 7: Place the percolator on the stovetop burner with the lid shut.
Tip: Place the percolator more to one side of the burner, with the handle facing out and not over the burner, this way you won't burn yourself.
Step 8: Turn stovetop burner on medium-high to warm the water so that it can boil. Stay near the stove to monitor the boiling of the water and the temperature of the burner.
Warning: The stovetop burner and percolator are extremely hot. Be sure to only touch the black handle of the percolator or use an oven mitt to prevent burns.
Step 9: When you hear a rising boiling sound, decrease the burner temperature to medium to avoid burning the coffee. At this point, the coffee will begin to rise in the upper chamber through the spout.
Note: The temperature of the burner may vary depending on your stove. The more often you make stovetop espresso you will find the correct burner temperature for your stove. If the coffee is pouring out of the spout very quickly, lower the temperature of the burner.
Step 10: When you hear a sizzling or gurgling sound, the coffee is ready!
Step 11: Remove the percolator from the burner by holding the black handle and place the percolator on your pot coaster or any heat resistant surface.
Tip: Removing the percolator as soon as your hear the gurgling sound will prevent the coffee from burning. This is to ensure the best taste.
Step 12: Pour and enjoy. Salute!
Tip: Wash the stovetop espresso maker thoroughly of all coffee and coffee grinds. This will maintain the product and will also make sure that each espresso cup tastes perfect.
Now that the coffee is ready, you can drink it as you like! You can pour into a mug, add sugar, milk or cream, or some frothed milk for a little barista-fun at home. Or you can drink it the Italian way, which is to say, black or with a tad of sugar and a biscotti on the side.
Why should you get a stovetop espresso machine? Maybe Emma can explain:


This was a really great instruction set. I feel like some people are daunted by making their own coffee this way, but you were able to make it so that it seems easy. I, myself, like my coffee better done this way and now I can do it myself!
You took something complex and made it super easy to follow by providing your readers a clean and straightforward instructions set. Good Job :)
Thank God for this guide! I was starting to be ashamed to be Italian and not know how to use these cafeterias. Also, great tip about not filling the boiler with water past the safety release valve; that explains why all my attempts ended up in a mess. -_-
Oh Kevin, that made me laugh!! I won't lie…it has exploded on me too!
Thanks for the comments everyone :)